Knowledge Center
How to Install and Maintain Boiler Conductivity Electrodes

Maintaining the water quality and conductivity in your boiler is extremely important. Learning how to properly install and maintain your boiler conductivity electrode will help improve the performance of your boiler. Avoiding excessive blowdowns will save water and chemicals and could lengthen the overall life of your system.
Installing a Boiler Conductivity Electrode
Below are key points to help ensure proper operation when installing a boiler conductivity electrode.
- Make sure the water level in the boiler is at least 4-6 inches above the surface blowdown line.
- Maintain the manufacturer’s recommended pipe ID with no flow restrictions from the shut off valve to the electrode. Minimizing the usage of tees, valves, elbows or unions between the boiler and the electrode will help minimize the possibility of the sample water flashing.
- Install a full port manual shut off valve at the boiler so the electrode can be removed and cleaned. Be sure to keep the distance between the valve and electrode as short as possible.
- Mount the electrode in the side branch of a tee in a horizontal run of pipe. This will minimize entrapment of steam around the electrode and will allow any solids to pass through.
- There MUST be a flow restriction after the electrode and/or control valve to provide back pressure. This flow restriction will be either a flow control valve or an orifice union. The amount of the flow restriction will affect the blowdown rate as well, and should be sized accordingly. Refer to your manufacturer’s recommendations for sizing.
- Install the motorized ball valve or solenoid valve per the manufacturer’s instructions.
- For best results, align the hole in the conductivity electrode so that the direction of water flow is through the hole.
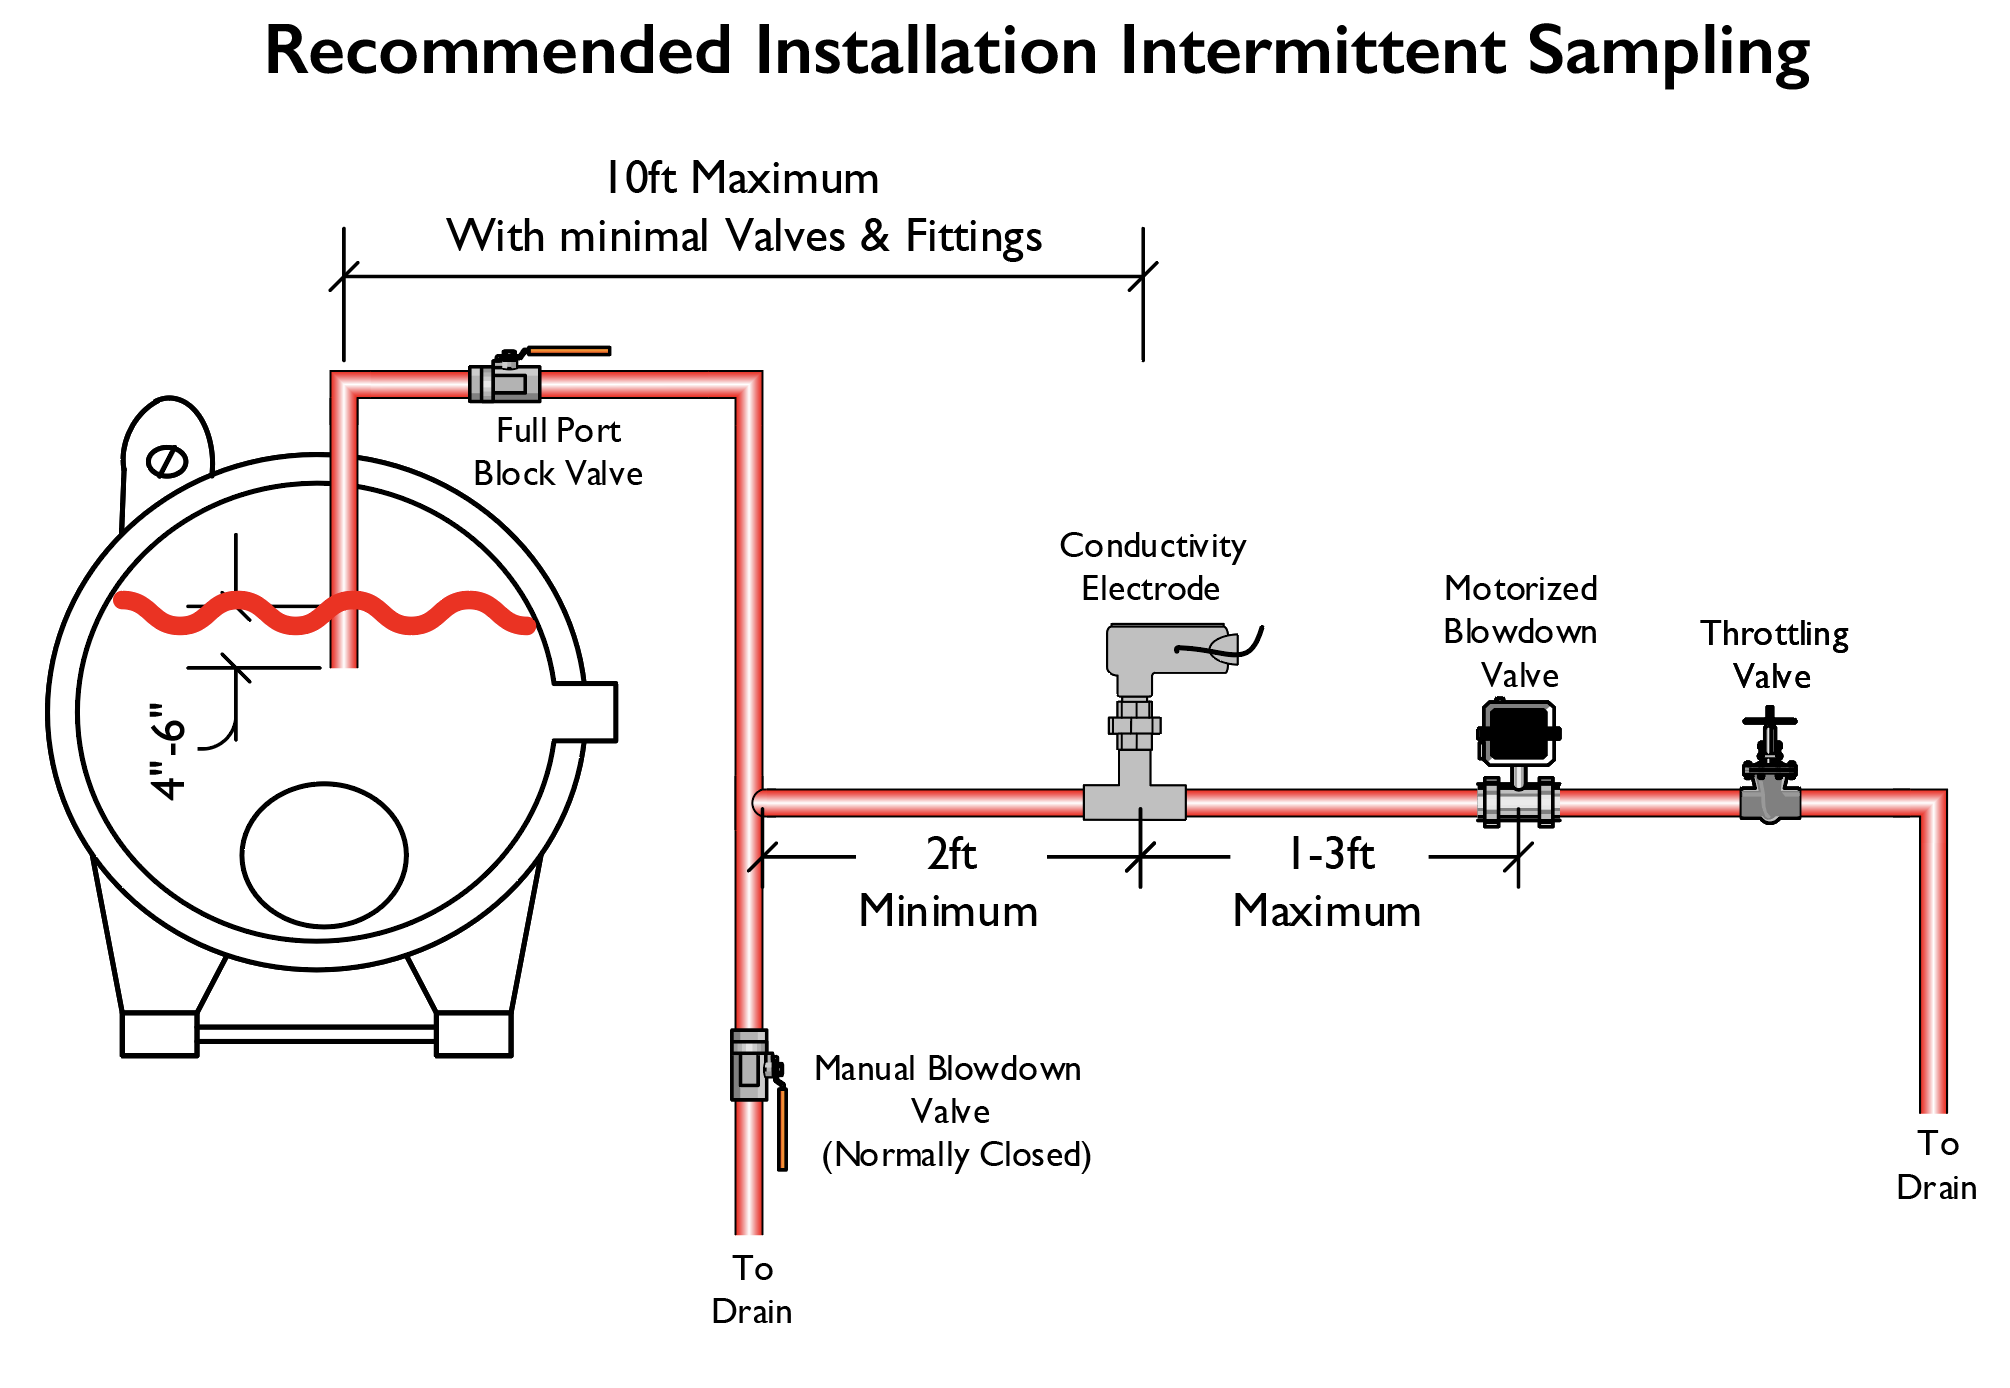
Maintaining Conductivity Electrodes
Calibration
Calibration of your conductivity probe is critical to maintaining the proper cycles of concentration in your boiler. The easiest and most effective way to calibrate your probe is to spot check your boiler conductivity sensor with a calibrated handheld meter. The meter is calibrated using a conductivity standard.
Take a manual reading several times per week and compare it to the conductivity probe. If the reading is off by more than 10%, a calibration is necessary. The actual calibration method depends on your controller. Most have the option to do a one-point process calibration. Follow the instructions for your controller and input the reading from your manual test.
Cleaning
If you have a hard time calibrating the probe or the readings between the sensor and manual test are excessive, then it may be necessary to clean the sensor.
For removal of scale or iron deposits, dip in a dilute hydrochloric or gallic acid solution, and rinse thoroughly. For oils (including fingerprints!) wash with a detergent.
After cleaning, it may be necessary to recalibrate the electrode.
Troubleshooting
Low or unstable conductivity readings could be due to a variety of conditions. The following is a guideline and as always, consult your equipment’s manuals for the manufacturer’s recommendations.
- Try cleaning and recalibrating your electrode.
- Check to see if the sample is flashing. Close a valve downstream of the electrode. If the reading climbs and stabilizes over the next few minutes, more than likely the sample is flashing.
- Check the manufacturer’s installation recommendations to ensure that the electrode was installed correctly. Key things to check are the electrode distance from the surface blowdown shut off valve, minimal fittings between the shut off valve and the electrode, pipe size (no restrictions) and the throttling valve setting.
If the electrode is clean, the sample is not flashing and the plumbing is correct, but the conductivity is not reading correctly, perform the following steps.
- Remove the electrode and place it in a beaker of boiler water with a known conductivity value. Note – Some controllers will read conductivity only when it’s “sampling”. If the controller is set up in “Intermittent Sampling” mode, you must initiate the sampling mode for the controller to begin reading the conductivity.
- If the conductivity reading matches the sample, connect a wire between the beaker of water and the pipe. If the conductivity value changes (usually lower), there is a ground loop and there may be a problem with the electrode wiring. Contact the Manufacturer for assistance.
- If the installation is satisfactory, the next step would be to check the electrical wiring.
Other Potential Problems
Electrode leaking: Occasionally the electrode could leak boiler water into the internals of the electrode. Carefully examine the electrode and junction box for signs of leakage.
Temperature element: If the temperature reading is the problem, follow the Manufacturer’s directions for testing the conditioning card, the electrode and the controller’s sensor card. There are multiple possibilities for the issue, performing a few simple tests will help you determine exactly where the problem is.
Grounding issues: Even though all wiring may be properly installed, a potential problem with the controller ground may be the cause of the calibration problem. Have a qualified electrician check to see if the power panel the controller is connected to is properly grounded. Removing the electrode from the process and placing overnight in a beaker of standard solution can also verify this. If the reading drifts, improper grounding of the controller may be the problem. If it does not drift, the process itself may be poorly grounded.
Proper maintenance of your boiler conductivity electrodes will help improve the performance of your system. If you have any questions regarding your equipment reach out to the Watertech Applications Team at 414-377-4612. We are always happy to help.

Let’s start with your system.
Because every facility is different, our best insights come from an on-site evaluation. Click below to request a site survey — one of our Technical Engineers will reach out to schedule a visit.